Let’s face it: business requirements change frequently, and you have to adapt to these evolving needs. But expanding app functionality smoothly can be difficult. Using a no-to-low code tool like Skuid makes difficult app requests not only possible, but simple and fast.
Dashboards are one of the most commonly requested apps, and as a builder, you need to continually iterate on them to adapt to changing business needs.
Dashboards can also get very complex. In this post, we’ll walk you through a real-life request to make a dashboard easier to update. The request started simple and quickly grew in need and complexity.
If you’re ready to flex your tentacles and pick up an advanced way to scale your app-building process, this post is for you.
Building complex dashboards in Skuid
Dashboards can be packed full of complex data models interacting with each other in various ways to display summary information to decision-makers and curious employees.
When building dashboards with Skuid, there are often multiple data models operating on one or more data sources to expose your company’s information in all sorts of ways.
You may have multiple aggregate models that return similar data sets that are summarized in different groupings. You could even have data coming from different sources that all need to filter down to the same date range, or even similar text or numerical values, depending on the nature of your data.
These models can be dynamic. The Action Framework allows you to update a date range or a category so that users can get answers to specific questions. But to do this, every model needs to have its conditions adjusted and repeating the action definition for every model is painful, making a Skuid page harder to maintain and improve. Remember, you have lots of models.
Save your sanity with action sequences
Action sequences allow you to define a list of actions that you need to use multiple times. And you can specify input parameters that make it easy to generalize the actions within.
To follow the dashboard scenario mentioned above, let’s walk through a request for making dashboards easier to update.
“It’s just a little app”
Famous last words. We’ve all been involved in a project that started small and, over time evolved into something no one envisioned by the end. And when user requests come in piecemeal, it’s easy for an app to become unwieldy.
That’s what happened to us with one particular project. Here’s a rundown of requests that came in over time. Users wanted:
- Two tabs—“This Month” and “Last Month”—that show pre-filtered slices of data.
- Each tab needed exhibits for three different views (we’ll call them A, B, and C) from a single data source.
- Later they added three more exhibits (D, E, and F) along with “This Year” and “This Quarter” tabs.
Clearly, this was when we started to think about building Skuid pages that we could easily expand: by nesting action sequences.
Setting up the action sequence
For this project, we began to identify the patterns by looking at the similarities in each of the models and actions on the page:
- Every model has a StartDate condition.
- Every model has an EndDate condition.
- Every model is named based on the values passed to its conditions (this makes it easy to identify later).
- Each tab shows one specific time period.
- Each tab queries one specific time period.
Next, we outlined pattern requirements. Based on these patterns:
- We only needed one model per exhibit type.
- Each exhibit’s model needed filterable conditions for StartDate and EndDate.
- We wanted a single action sequence to manage all this activity.
- We needed to specify a value for StartDate and EndDate.
Let’s show what that looked like.
Dashboard set up
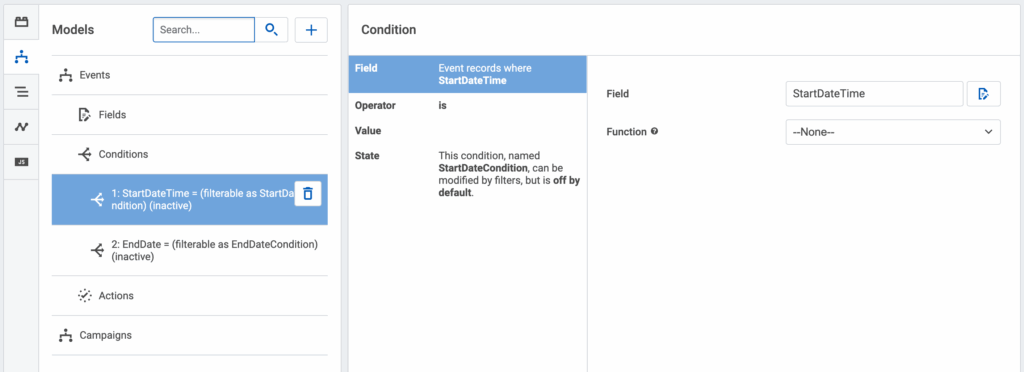
Models and conditions
One model per exhibit type and each exhibit’s model must have filterable conditions for StartDate and EndDate. You can view the setup screenshot below this text:
A
- StartDate (filterable)
- EndDate (filterable)
B
- StartDate (filterable)
- EndDate (filterable)
C
- StartDate (filterable)
- EndDate (filterable)
D
- StartDate (filterable)
- EndDate (filterable)
E
- StartDate (filterable)
- EndDate (filterable)
F
- StartDate (filterable)
- EndDate (filterable)
Action sequence
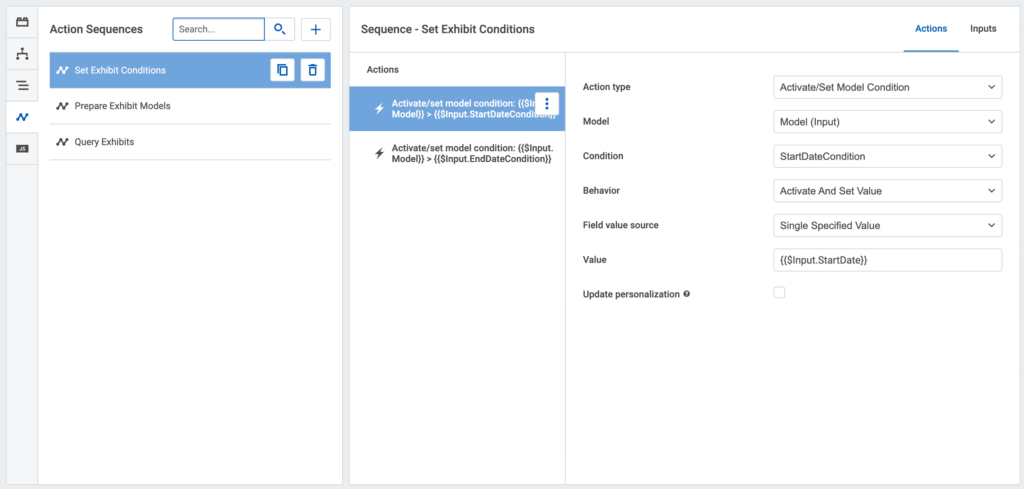
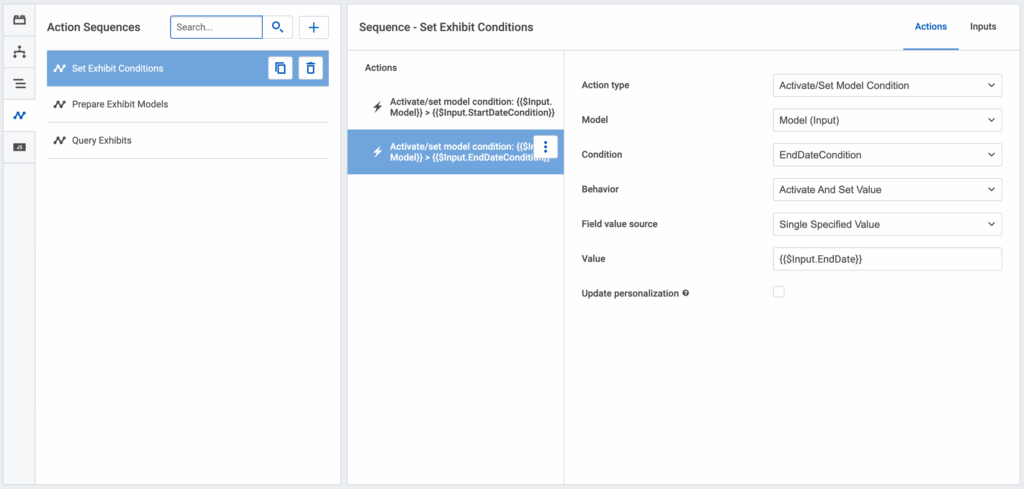
We wanted a single action sequence to manage all this activity. That meant creating a new reusable action sequence called Set Exhibit Conditions.
Specify a value for StartDate and EndDate
In Set Exhibit Conditions, we made the following input parameters:
- Model: model
- StartDateCondition: model condition
- StartDate: value
- EndDateCondition: model condition
- EndDate: value
Now, we can specify the actions in Set Exhibit Conditions to update the models in a generalized way.
- Set Exhibit Conditions
- Activate & Set Model Condition
Model: StartDateCondition = StartDate - Activate & Set Model Condition:
Model: EndDateCondition = EndDate
Nesting the action sequence
We could call the “Set Exhibit Conditions” sequence for every model. But that’s still too much repetition. So, we added another action sequence, remembering what we learned from identifying a pattern and outlining pattern requirements.
Identify patterns
On every tab, we would have done the following:
- Call Set Exhibit Conditions once for each model
- Setting condition values the same way for each model
- Querying each model
Outline pattern requirements
- We need to specify condition values once for all models.
- We need to query all models.
Since we already have an easy way to query all the models with a basic Skuid action, we only care about the first point.
Build the nest
Specify condition values once for all models
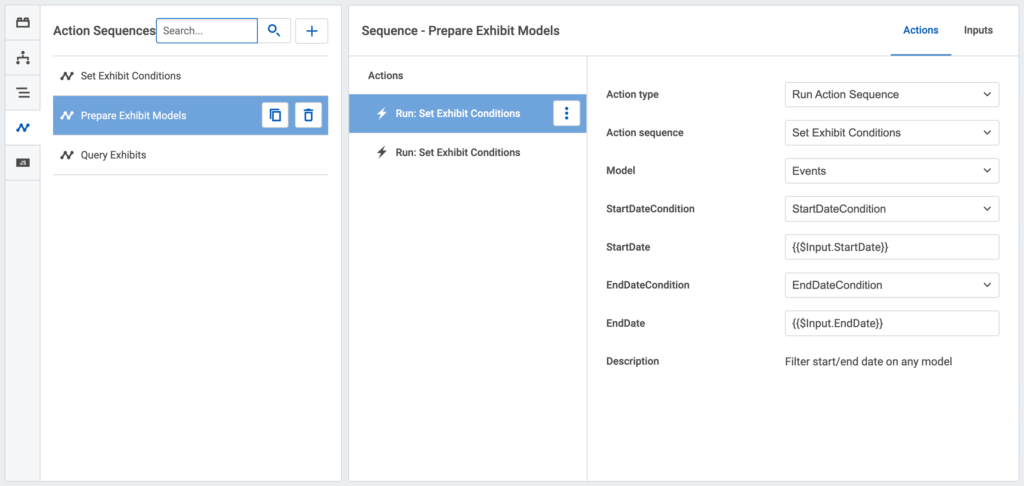
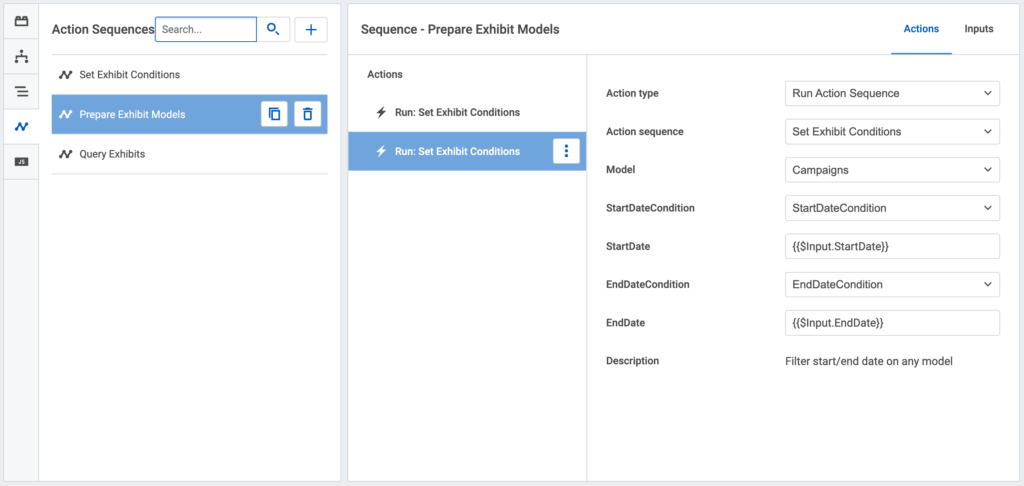
We created a new reusable action sequence called Prepare Exhibit Models with the following input parameters:
- StartDate: value
- EndDate: value
We then followed one of the tab’s lists of actions and defined them in this action sequence, replacing the explicit value with a reference to the input parameters. You can view the setup screenshots below this text:
Prepare Exhibit Models
- Run: Set Exhibit Conditions
- Model: A
- StartDateCondition: StartDate
- EndDateCondition: EndDate
- StartDate: {{$Input.StartDate}}
- EndDate: {{$Input.EndDate}}
- Run: Set Exhibit Conditions
- Model: B
- StartDateCondition: StartDate
- EndDateCondition: EndDate
- StartDate: {{$Input.StartDate}}
- EndDate: {{$Input.EndDate}}
- Run: Set Exhibit Conditions
- Model: C
- StartDateCondition: StartDate
- EndDateCondition: EndDate
- StartDate: {{$Input.StartDate}}
- EndDate: {{$Input.EndDate}}
- Run: Set Exhibit Conditions
- Model: D
- StartDateCondition: StartDate
- EndDateCondition: EndDate
- StartDate: {{$Input.StartDate}}
- EndDate: {{$Input.EndDate}}
- Run: Set Exhibit Conditions
- Model: E
- StartDateCondition: StartDate
- EndDateCondition: EndDate
- StartDate: {{$Input.StartDate}}
- EndDate: {{$Input.EndDate}}
- Run: Set Exhibit Conditions
- Model: F
- StartDateCondition: StartDate
- EndDateCondition: EndDate
- StartDate: {{$Input.StartDate}}
- EndDate: {{$Input.EndDate}}
Almost there. Since we’re always querying the same models, let’s go ahead and throw those in an action sequence as well, named Query Exhibits. We’ll want them separate to be flexible for future user requests:
- Query Exhibits
– Query A, B, C, D, E, F

Using the nested action sequence
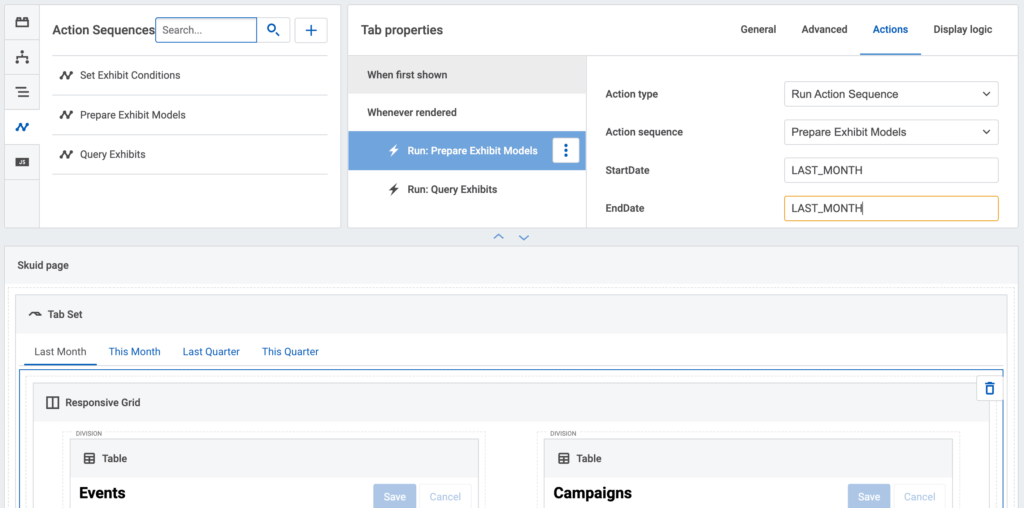
Each tab’s “Whenever Shown” actions now look like this. You can view the setup screenshot below this text:
This Month tab
Run: Prepare Exhibit Models
• StartDate = THIS_MONTH
• EndDate = THIS_MONTH
Run: Query Exhibits
Last Month tab
Run: Prepare Exhibit Models
. • StartDate = LAST_MONTH
• EndDate = LAST_MONTH
Run: Query Exhibits
This Quarter tab
Run: Prepare Exhibit Models
• StartDate = THIS_QUARTER
• EndDate = THIS_QUARTER
Run: Query Exhibits
This Year tab
Run: Prepare Exhibit Models
• StartDate = THIS_YEAR
• EndDate = THIS_YEAR
Run: Query Exhibits
That’s it!
Maintaining and improving the dashboard
When you need to iterate on this system because users love it, the changes can be very focused.
If your users want a new exhibit (shown in each tab) all you have to do is:
- Add the model (and add the components visualizing that data to your pages).
- Add a new action entry to the “prepare exhibit models” calling the new model, and add the new model to the list of Exhibits to Query.
If you users want a new tab of filtered data:
- Add the tab and configure the “Whenever Shown” actions using the new date values.
Explore, learn, and adapt
While the use case above may not fit your needs exactly, it’s simply one example of how you can adapt Skuid to handle complex scenarios without the need for writing code. Just like any groundbreaking technology, there’s a learning curve. To stay on top of that curve, follow us closely as we release new features.
Want more tips like these? Check out our ebook, Five best practices: Accelerating Salesforce app development and improving user experience.


